Front End Alignment on an RV
Front end alignment isn't something that most RV'ers will want to do and will opt to having a pro do the job.
It is a daunting job, and seems mysterious at best. It can be
done though. You may have been in my predicament of seeing
tire wear, pulling on the steering wheel, and loss of steering control. This
happened to me. I waited until I got home, and that
left me with two front tires in need of replacement.
I determined to learn how to align my front end. My RV is a 26
foot Fleetwood flair built on a P32 chassis by Chevrolet.
Many thousands of RV's were built on this chassis and it proved to be robust in
design. Many sneer at this, since the base chassis
was a P30 "bread truck" design.
Other brand of chassis are very similar, especially the independent suspension that my RV has. An I beam suspension will align with this method also.
I am only doing Toe In of the tires. You can do the caster and camber, but this is more difficult to do.
Toe in of the tires means the front outside edge of the front
tires are slightly closer together than the back outside edge of the tires.
This is necessary to make sure that the tires roll straight and true and the
tires don't wear out. Many vehicles use 0 (zero) toe in meaning the
tires are absolutely parallel and align with the back wheels. The 0 to 6 degree
toe in takes in allowance for play in the steering gear and
make sure that the tires roll straight when driving.
I watched many Youtube.com video's to see how others were doing
it. Most referenced automobiles and light trucks. The big rigs were left out.
As I used these methods, I was left out of information I needed to make a good
alignment In fact it is real easy to mess things up.
I will now describe how I found a way that accurately and
repeatedly make a good alignment.
Repeatability is crucial, since that proves that you do have a good alignment.
I discovered that with a large RV you don't have a good frame
of reference front to back. I couldn't use the back tires to visually look along
the front tires and see if the lined up front to back. My rig has dual tires and
they don't line up with the front tires. The tires are 15 feet behind the rear
ones too.
So every time I used this method I would line things up wrong. I needed a way to
make sure that the front tires were "square to the world"
with the back tires.
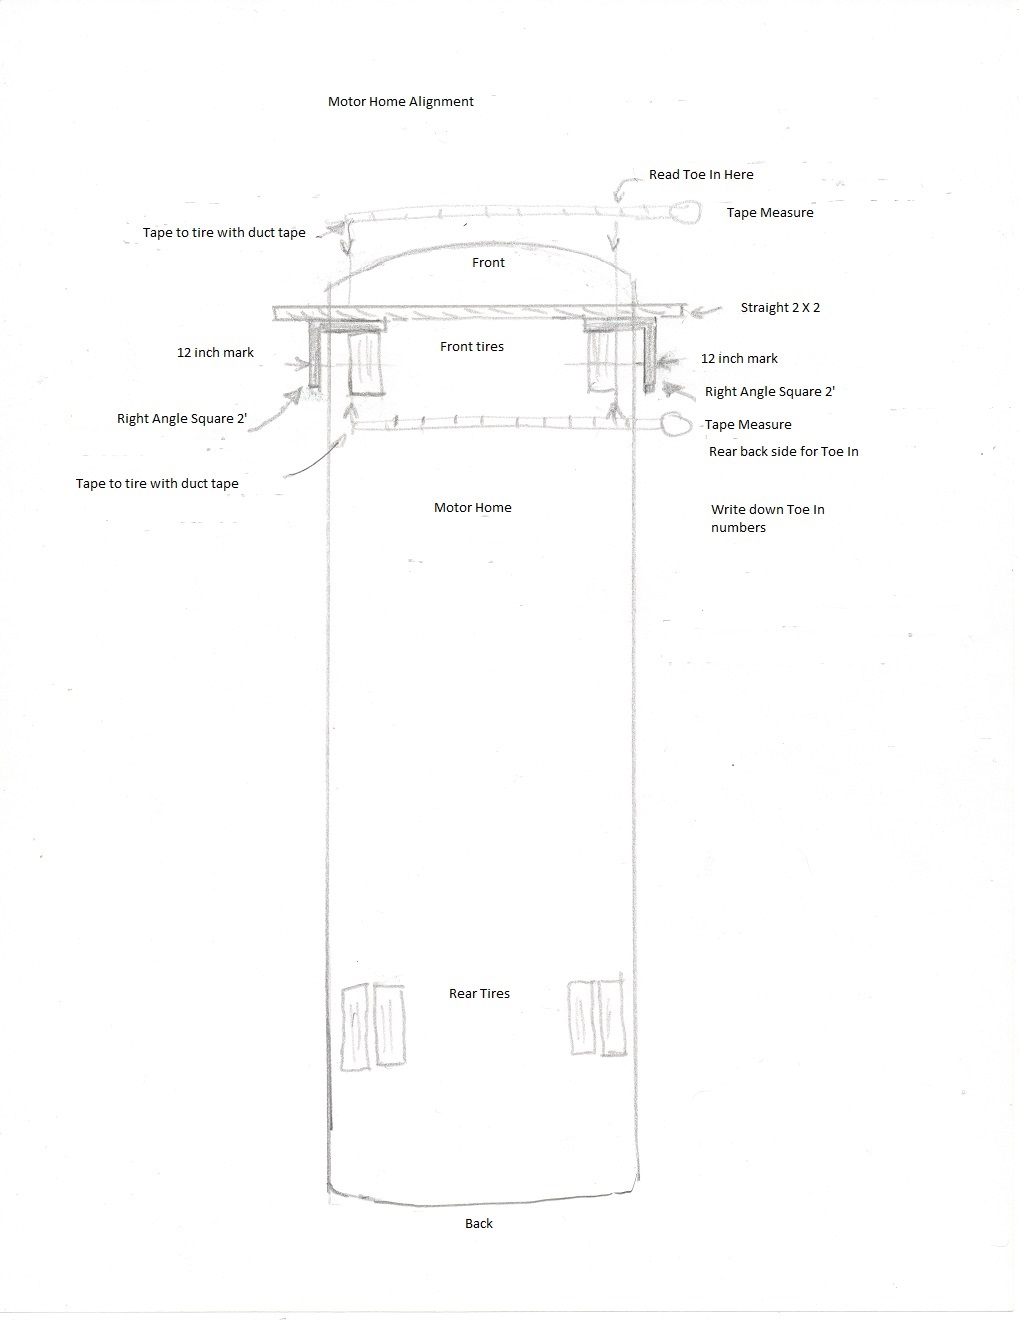
Here is my setup. I need to make the tires align perpendicular
to the body (frame). I used common carpenter squares, mine were 2 foot long
on the long side. You could use longer ones if you have them, you need two of
them, equal size. If you don't have them, buy them, they don't cost much,
but buy the longer length ones if possible, more accurate. My 2 foot carpenter
squares were actually too short. If I had longer ones that went to the back edge
of the tire then I could have measured on the tire edges, front and back. Then
the toe in would be an actual amount and not a smaller amount. My setup said
1/16th of an inch was about 1/4 inch total toe in.
The drawing below may clarify what my setup is.
I laid the short side of the square along the tire with the
long side in front of the wheel, pointing inward.
One on each side. Take a long 2 X 2 or 2 X 4 board and put this in front of the
squares touching the short sides.
I used the wheel well at the front to align the board so it would be
perpendicular with the vehicle this is a close setting.
The actual setting is 11 inches on the scale to the axle centerline. (This what
I used, your setup may use a different number.)
Keep the squares touching the board. This makes the squares parallel with the
tires on the short side of the
squares and with the vehicle length.
I set the 12 inch mark at the center of the wheel axel on both sides. If you use
bigger squares this number
may be different.
I used the long side against the tires, but you may want to use the short side
against the tire.
I pressed the squares toward the tires, keeping them pressed
up to the board. I used a machinist square setting
on top of the squares and placing it first on the back side of the tire,
pressing it to the tire sidewall.
Moving the carpenter square to the heel of the machinist square at the edge. I
then moved the machinist square
to the front of the tire, pressing it up to the tire sidewall and measuring how
much the tire was toed in or out.
Write this number down. Keep this as a reference. I then crawled under the front
corner of the RV and
measured the distance the tire was from the frame. (At the horizontal center
line of the tire.) Write this number
down too. (Always use the same places to record your data to keep it accurate.)
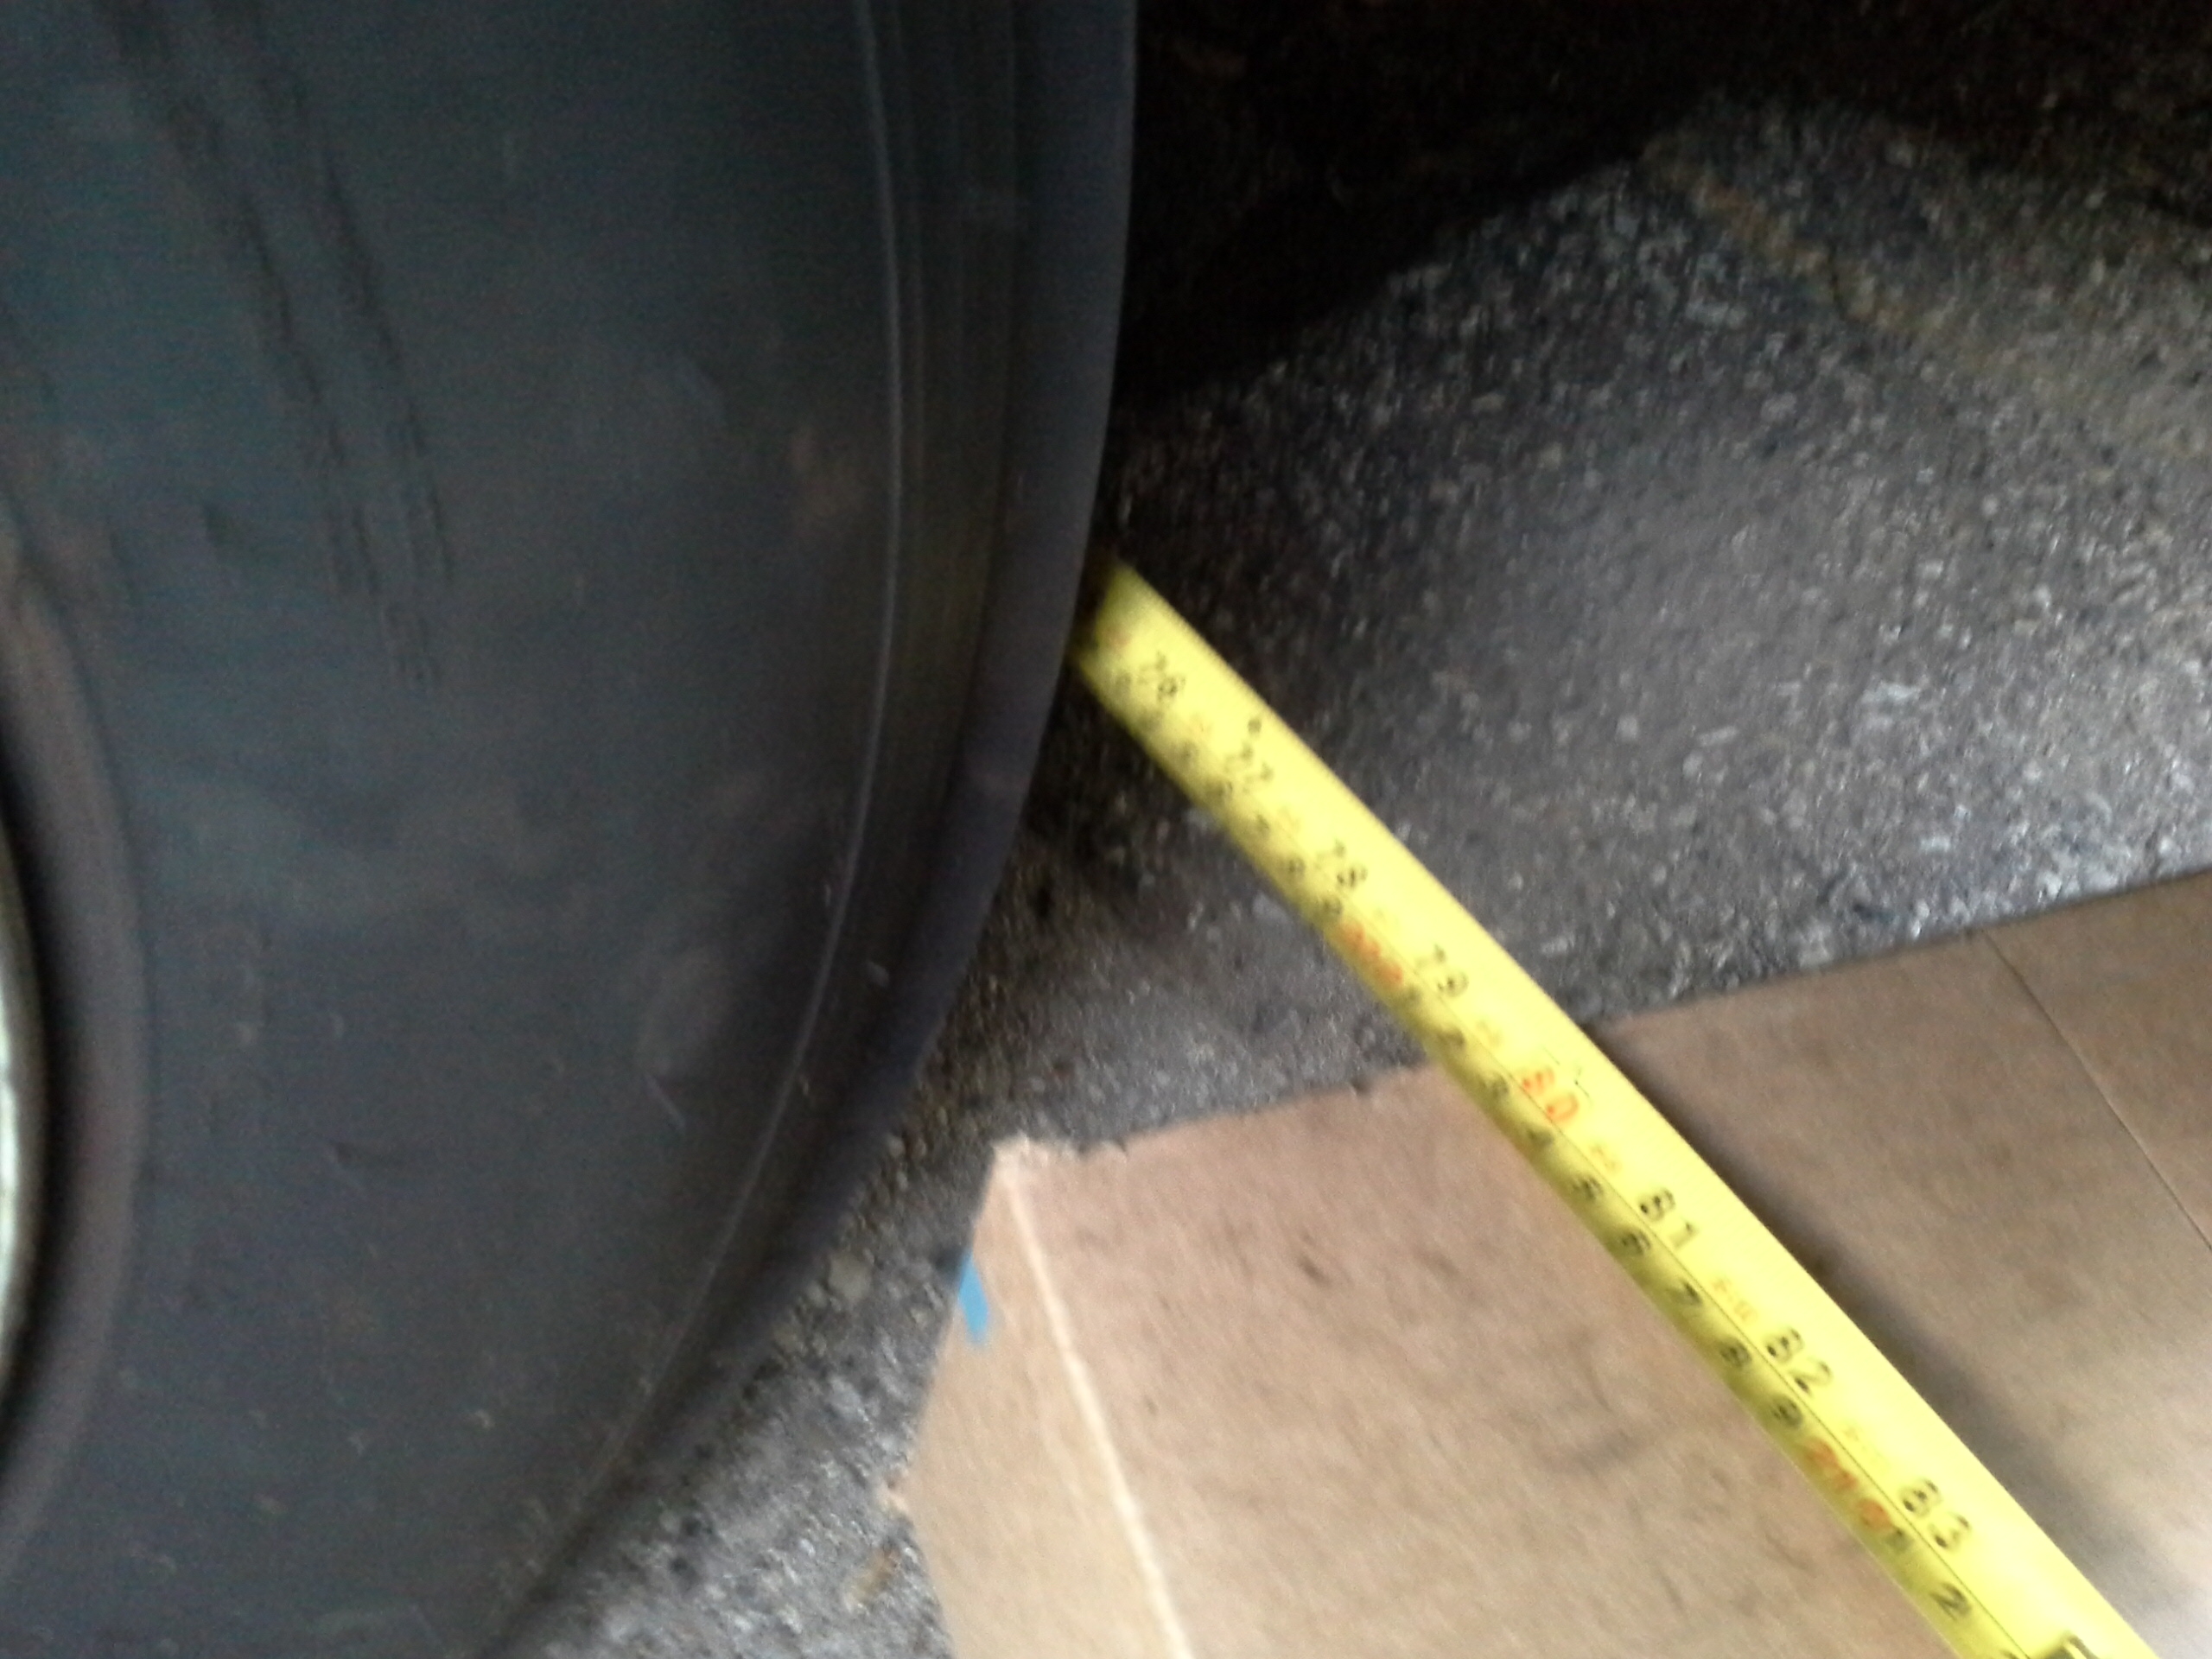
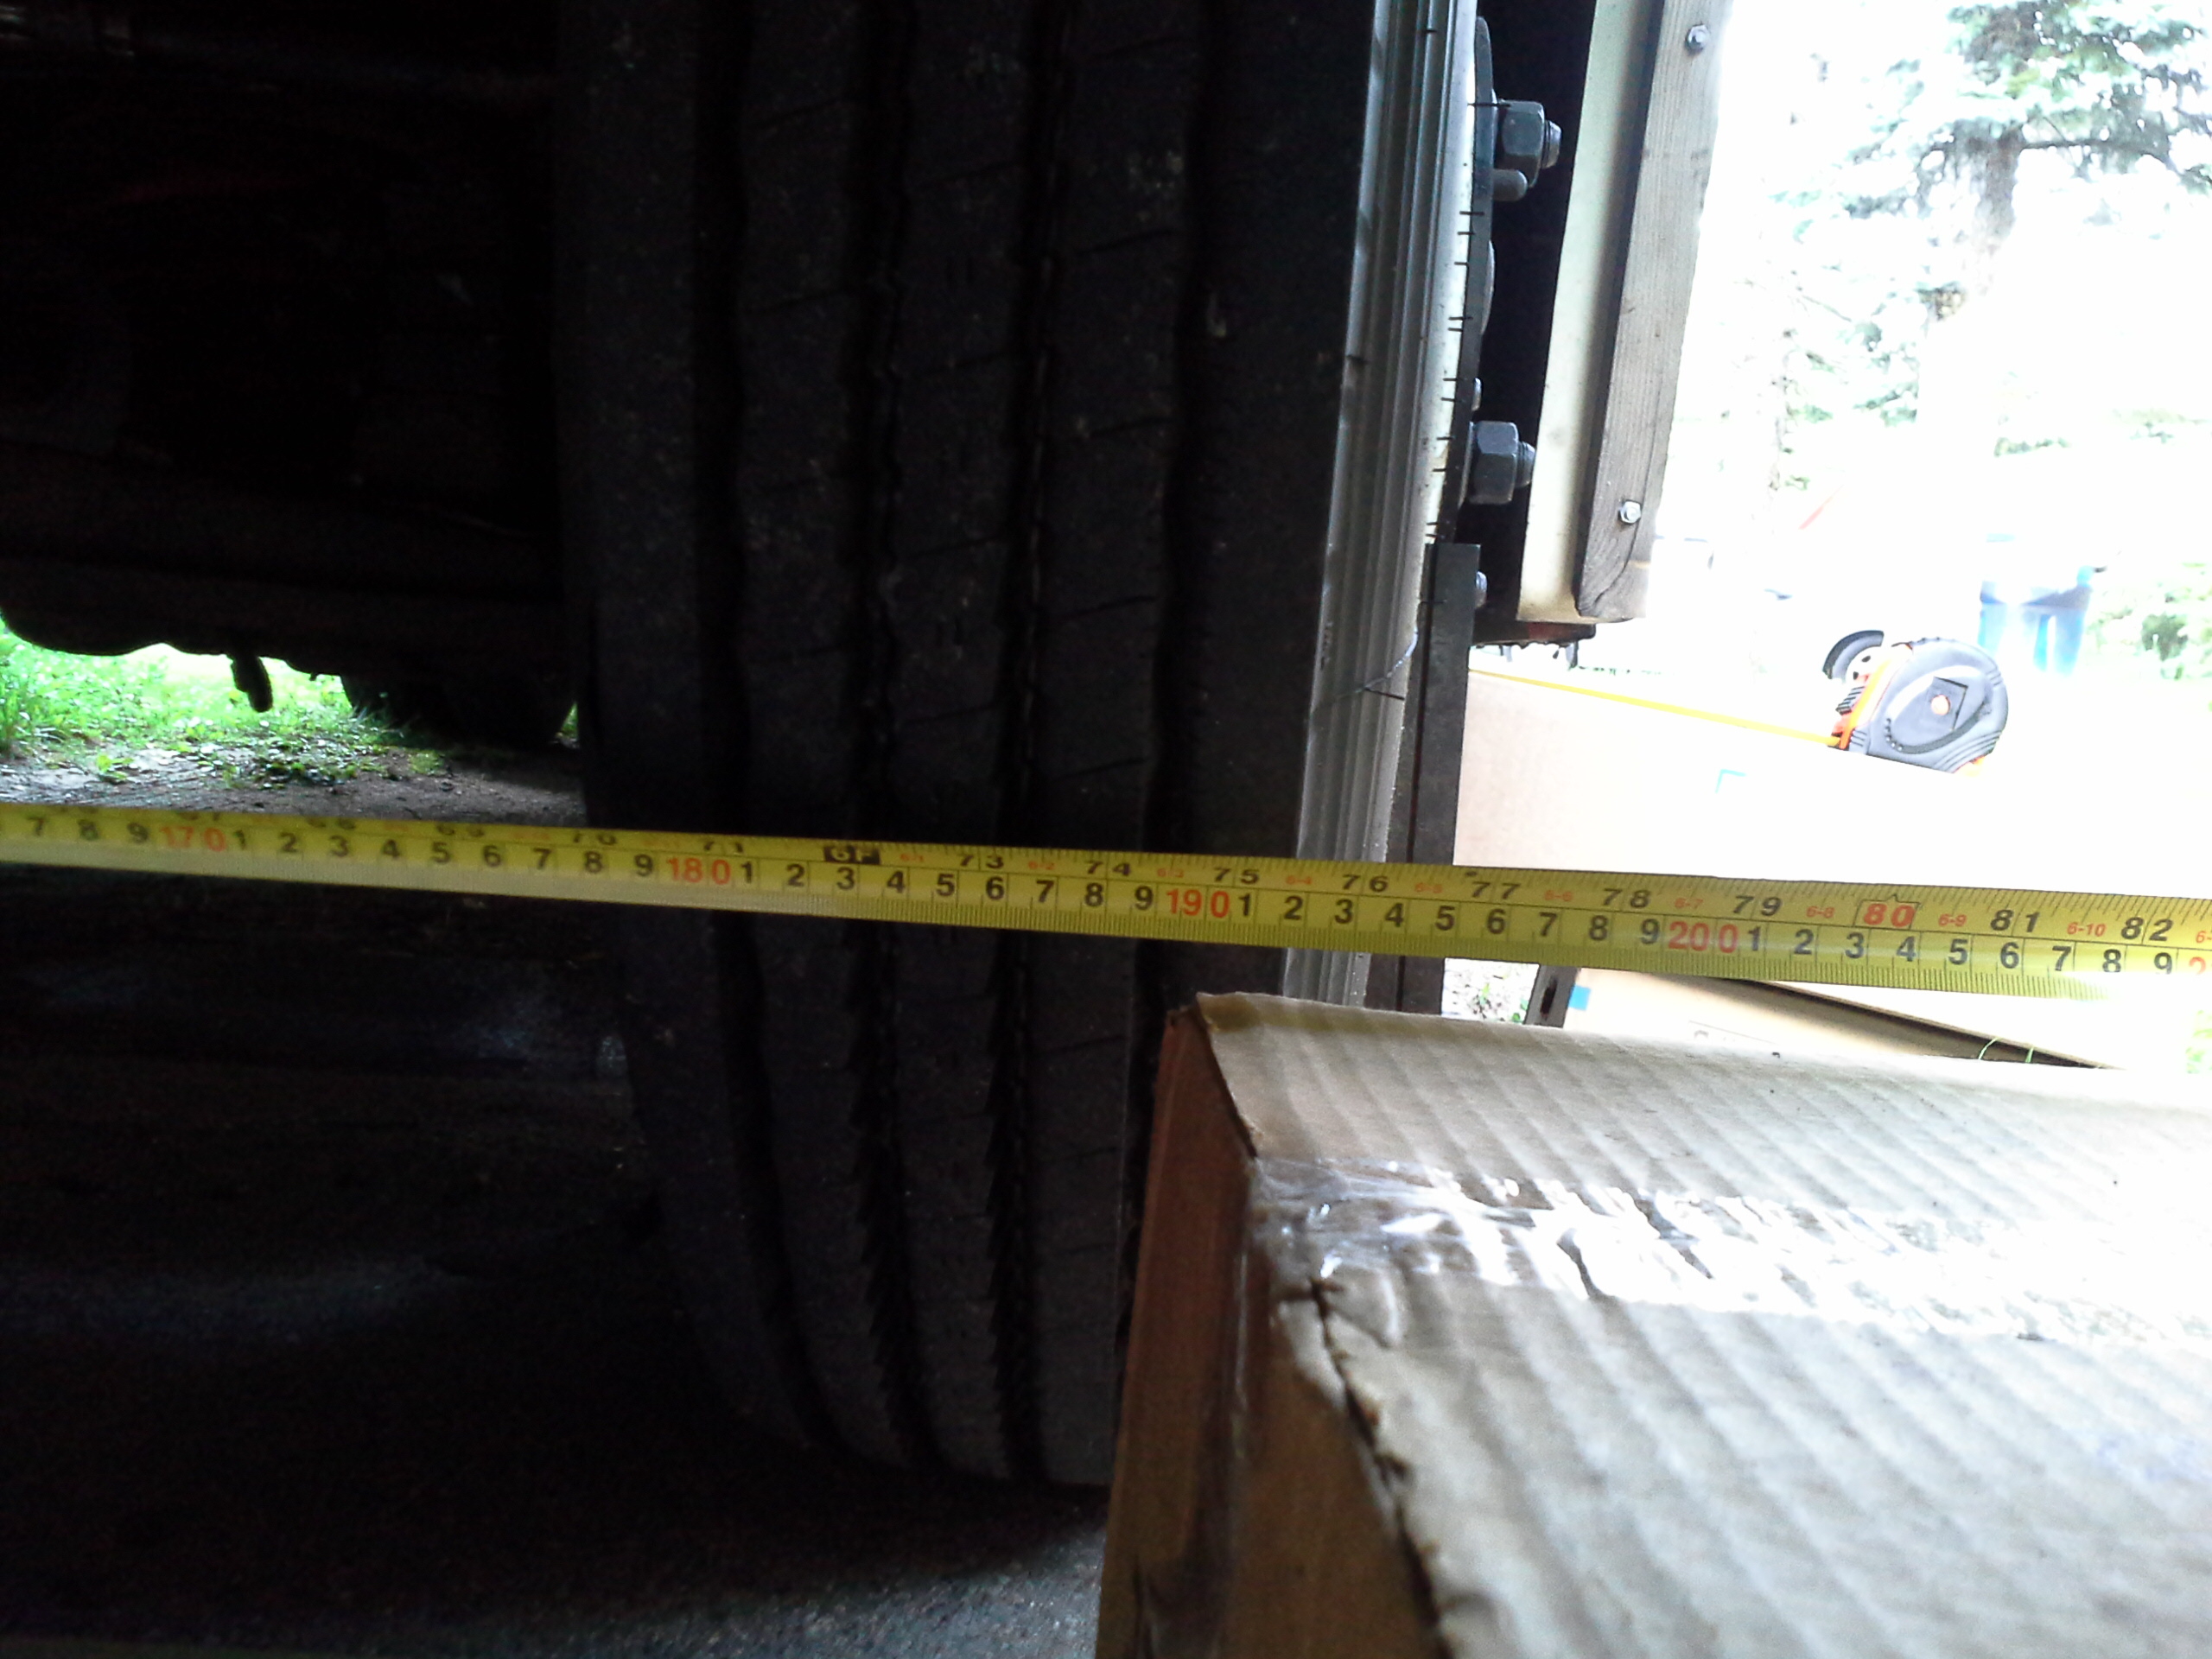
I placed boxes on one side of the RV next to the tires, (it
doesn't matter which side) one in front and the other in back.
Take a tape measure and extend it under the RV to reach the other tire outside
edge.
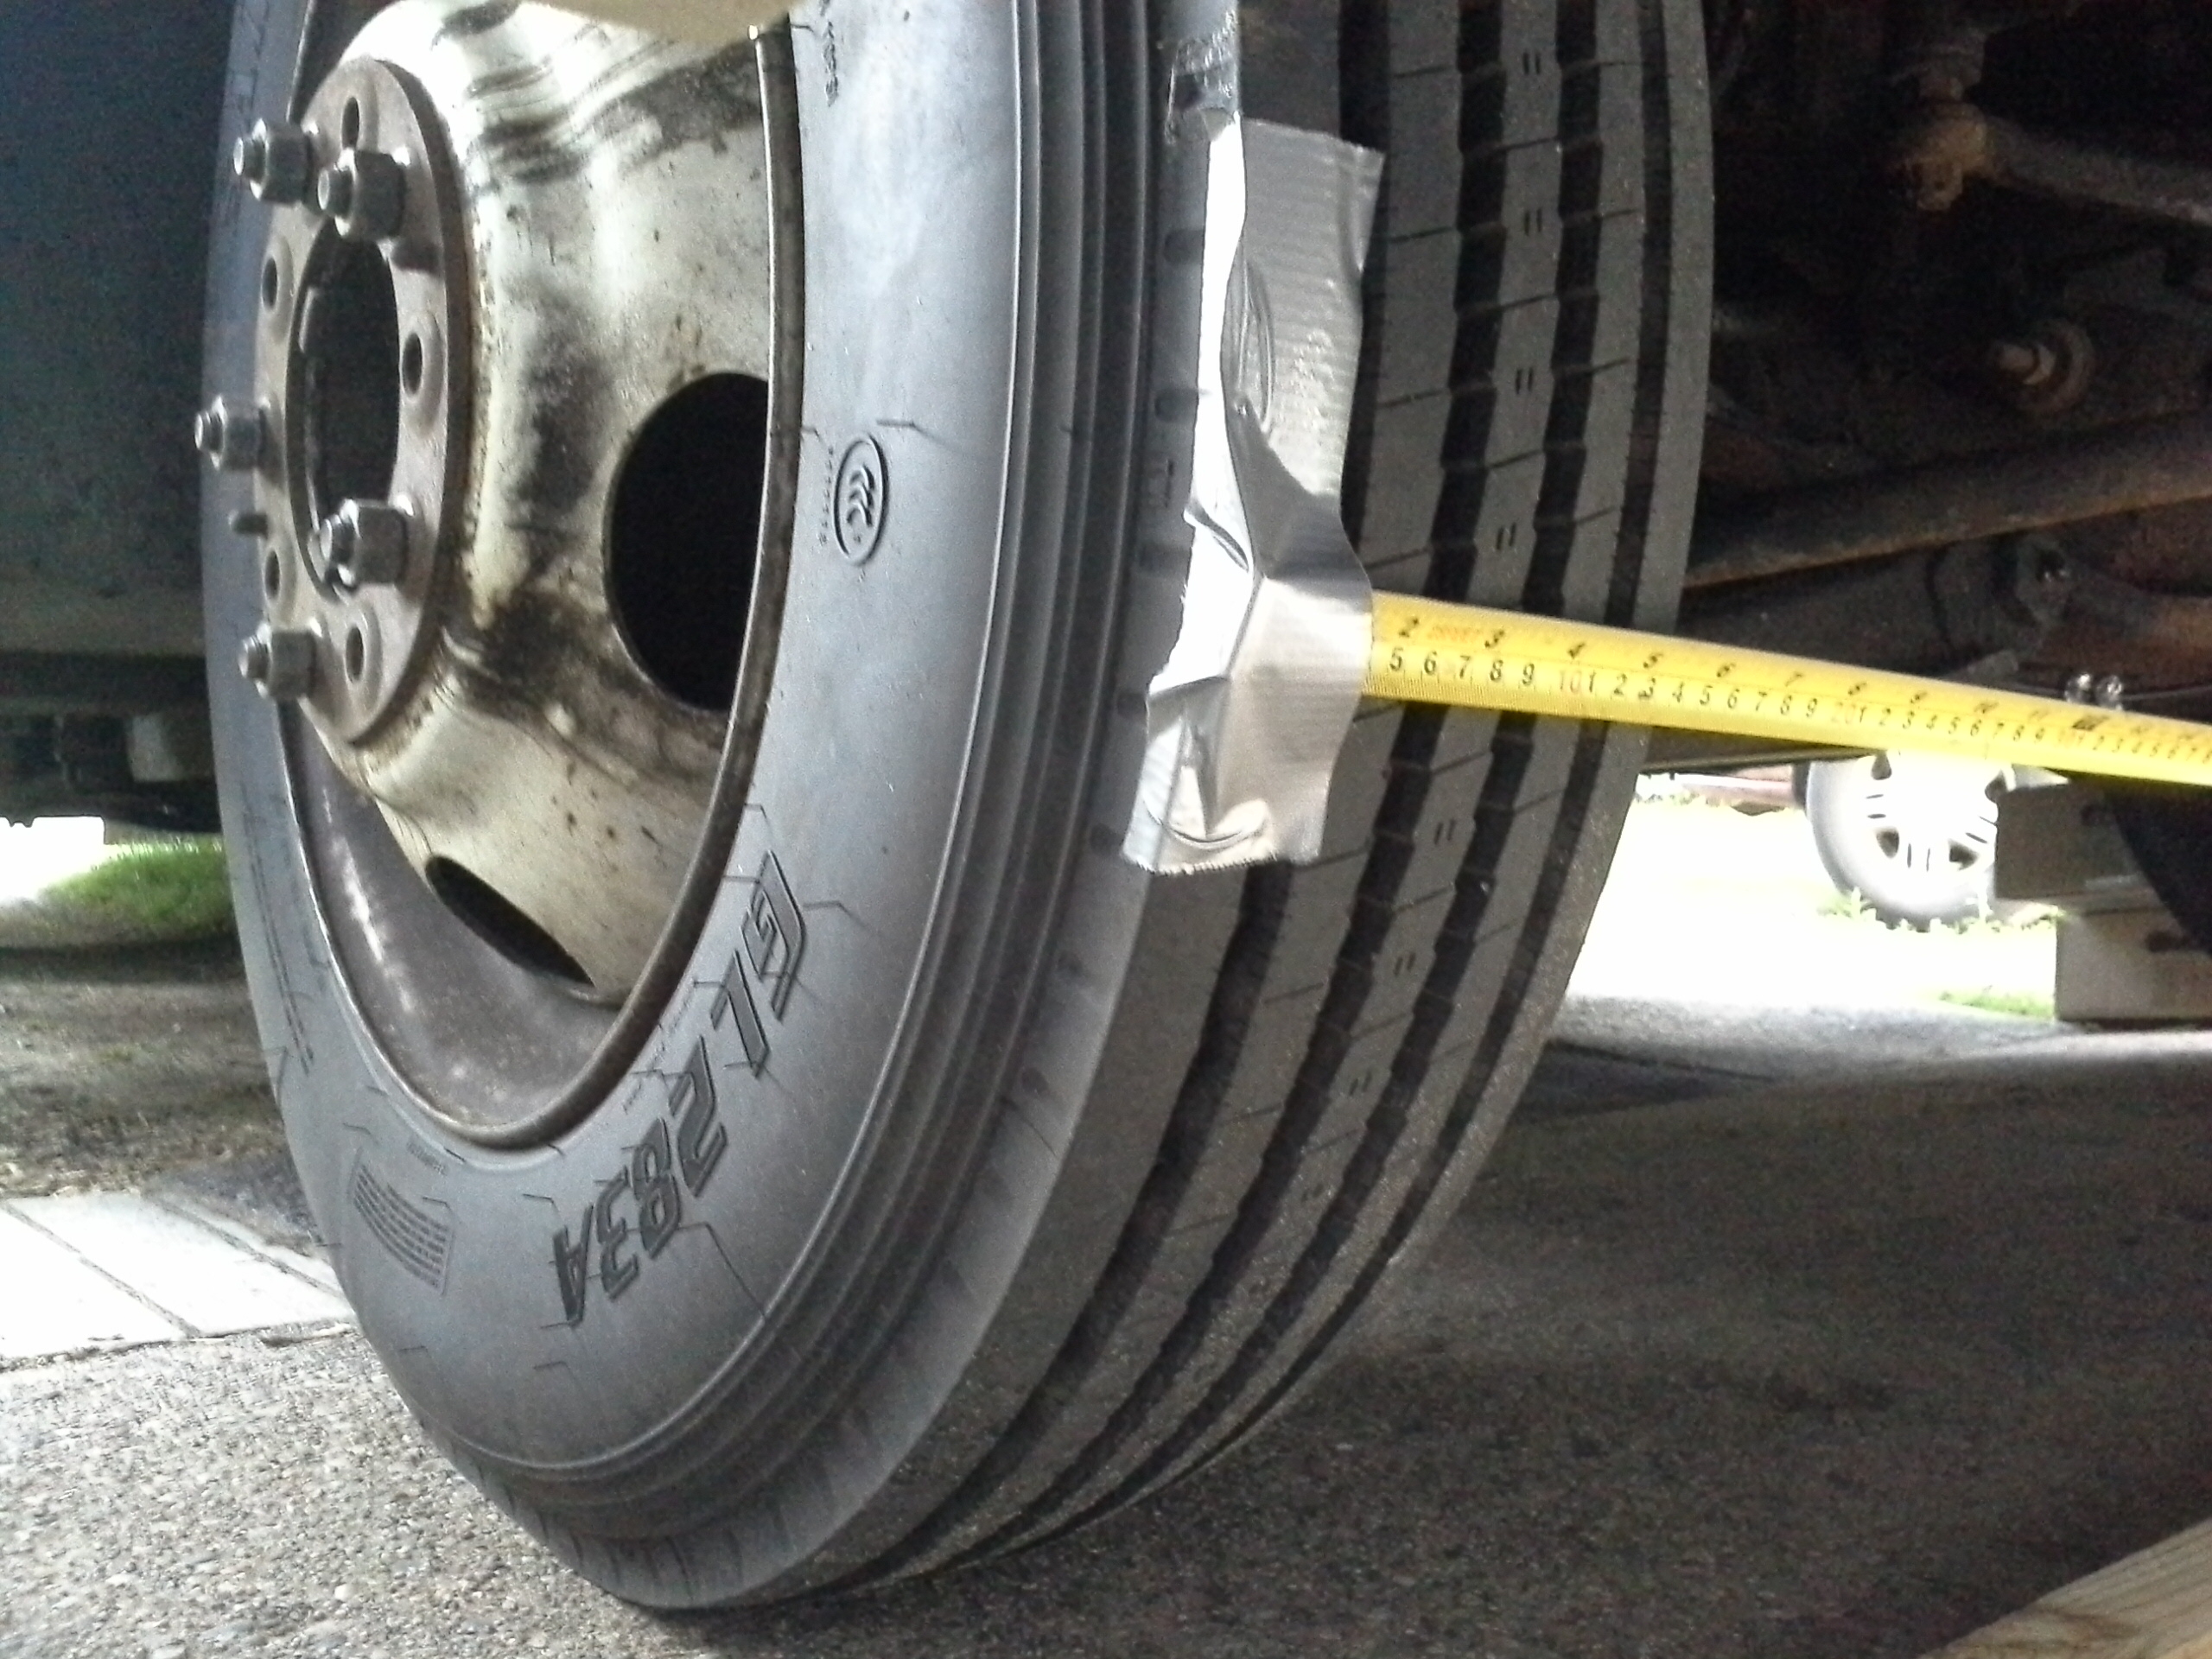
On the left, taped measure rule. Middle, the machinist square pressed to
tire. Note the heel of the square is up to the carpenter square edge.
Right, The machinist square at the front and see the toe in is about 1 inch. It
is way off. Harbor Freight Tools calls the machinist square a Combination
square.
Take 6 inch pieces of duct tape and tape the measuring tape end to the tire back side, and then the other tape measure to the front side of the tire. Place the tape measure on the box and tighten up them up and lock the tape locks down. Start at the back side of the tire and read what the outside edge number is. Write this down as a reference. Go and read the front tire and write this number down. Crawl under that corner of the RV and measure (I used the inside edge, but you can use the outside edge) the edge of the tire to the frame and write those numbers down. Keep those numbers since the are the starting point for your alignment. If things get screwed up you can always go back to the original setup this way.
This sounds complicated, but when you set it up it will be easy. You can measure very accurately and work down to a 32nd of an inch if you want to.
The toe in alignment is to bring the tires into the factory
specification for your vehicle. Google the toe in for your vehicle to know what
it is.
Compare this to what your RV shows. Make a drawing showing the front wheels, and
the steering wheel angle you have when driving.
Draw arrows near the wheels showing the direction needed to align the tires. I
found this helped me to know what I had to do to bring in the alignment.
Take the rear toe in number and subtract the front toe in
number. Record that as a new set of numbers, keeping them separate from you
first reference number set.
Divide this number by 4 to see what amount you must move each side
to achieve alignment.
The next step is to make sure that the steering wheel is
straight. I have to start the engine and use the power steering to do this.
Move the wheel left then right and back to center to settle the linkages. Turn
off the engine.
See if you can set the key so it locks the steering wheel
down straight. This helps in alignment not allowing the steering wheel to move.
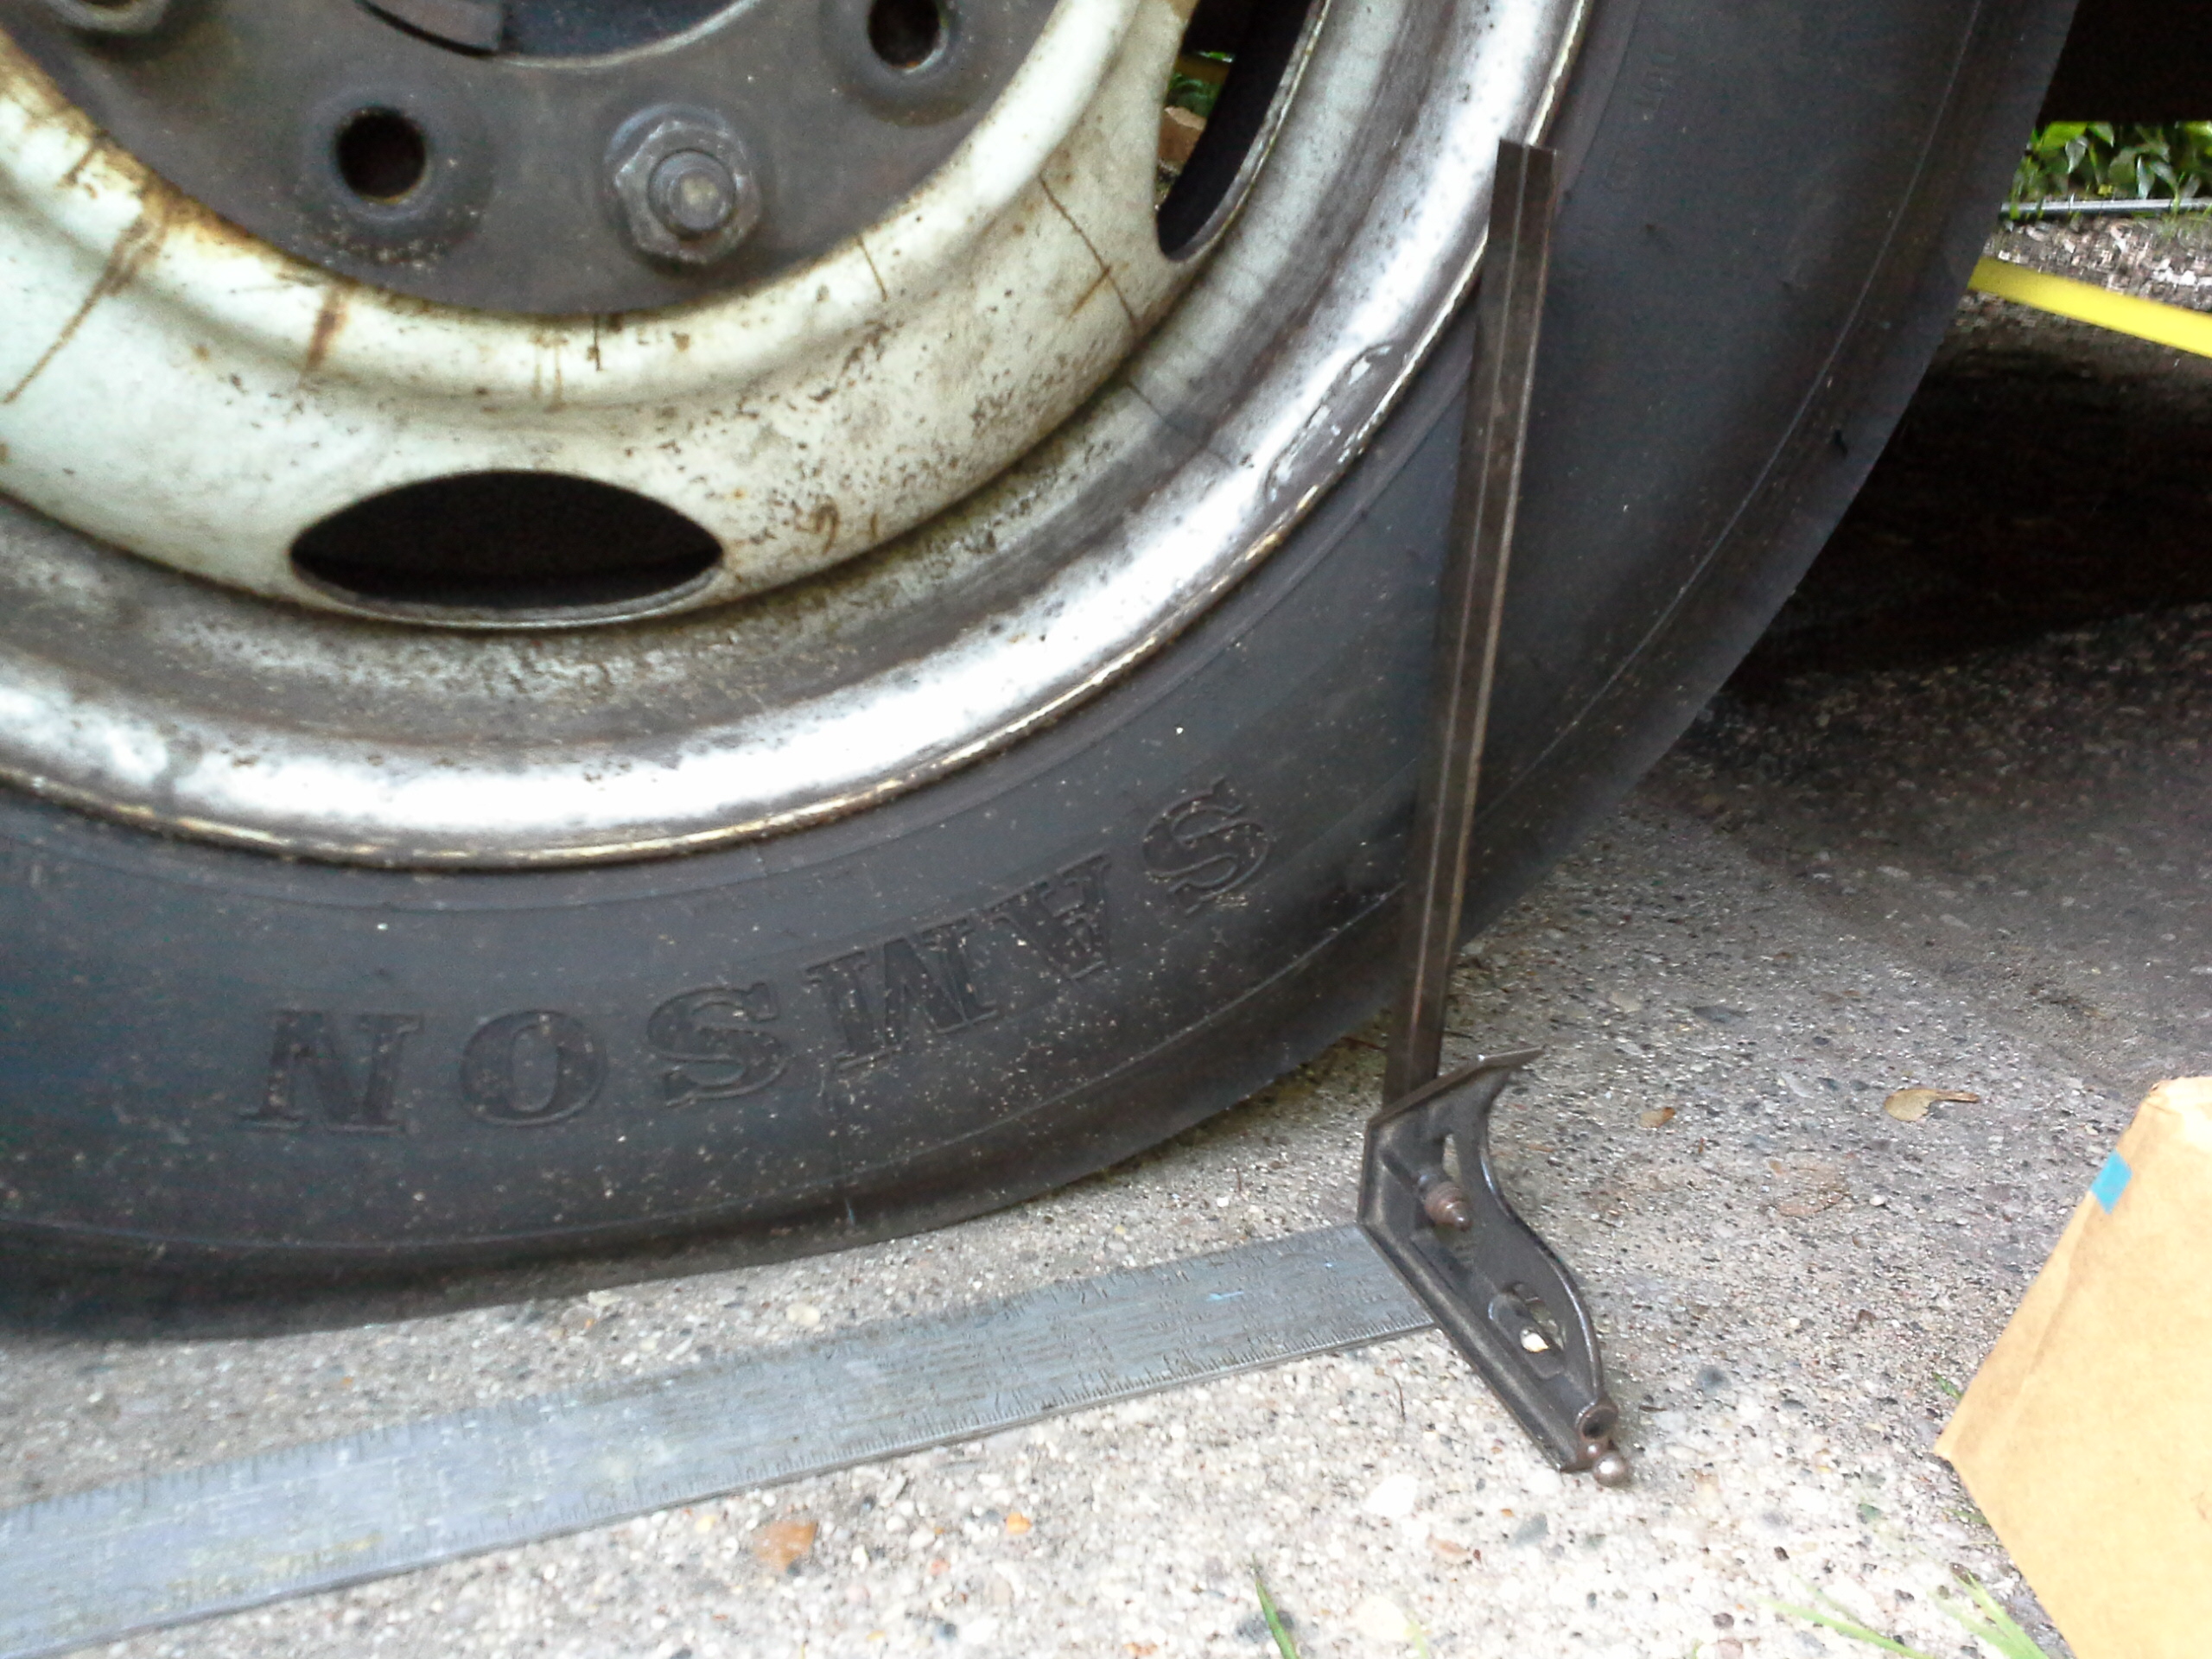
On
the right side picture you can see the machinists rule against the tire.
Look at the edge of the rule against the tire to see the adjustment you are making.
Back side measurement. It is a bit fuzzy but it was 75 3/4"
Front of the tire showing 75 7/16th The toe in is too big.
1/4 inch toe in would 75 3/4 back side and 75 1/2 front. This does not mean the
vehicle is aligned! Just the toe in.
You need to compare the machinist rule measurements on the squares, and see
which tire is too far in or too far out.
Then make an adjustment of both tires to close in on the alignment.
Note the boxes for the measuring tapes.
This 75 3/4 - 75 7/16= 11/16th" toe in. Since I need 1/4 " toe in or less
I need to re-align the wheels.
Very small adjustments are needed to make this work out. Look at what the
machinist square shows to determine
the direction. The machinist square
said I needed to toe out the drivers side wheel. Turn both right side and left
side the
same direction to move the toe in aligned wheels together in the direction
desired.
Dive under the RV and loosen the tie rod alignment bolts so
you can rotate the adjustment sleeves.
They are like turnbuckles, as one thread is right hand and the other is left
hand.
This pulls the tires in or out depending which way you turn them.
The left, drivers side, is "regular" in that right turns brings the tire inward
and left turns brings the tire outward.
I use the expression "righty tighty, lefty loosy", (righty is clockwise, lefty
is counter clockwise) to keep this in mind.
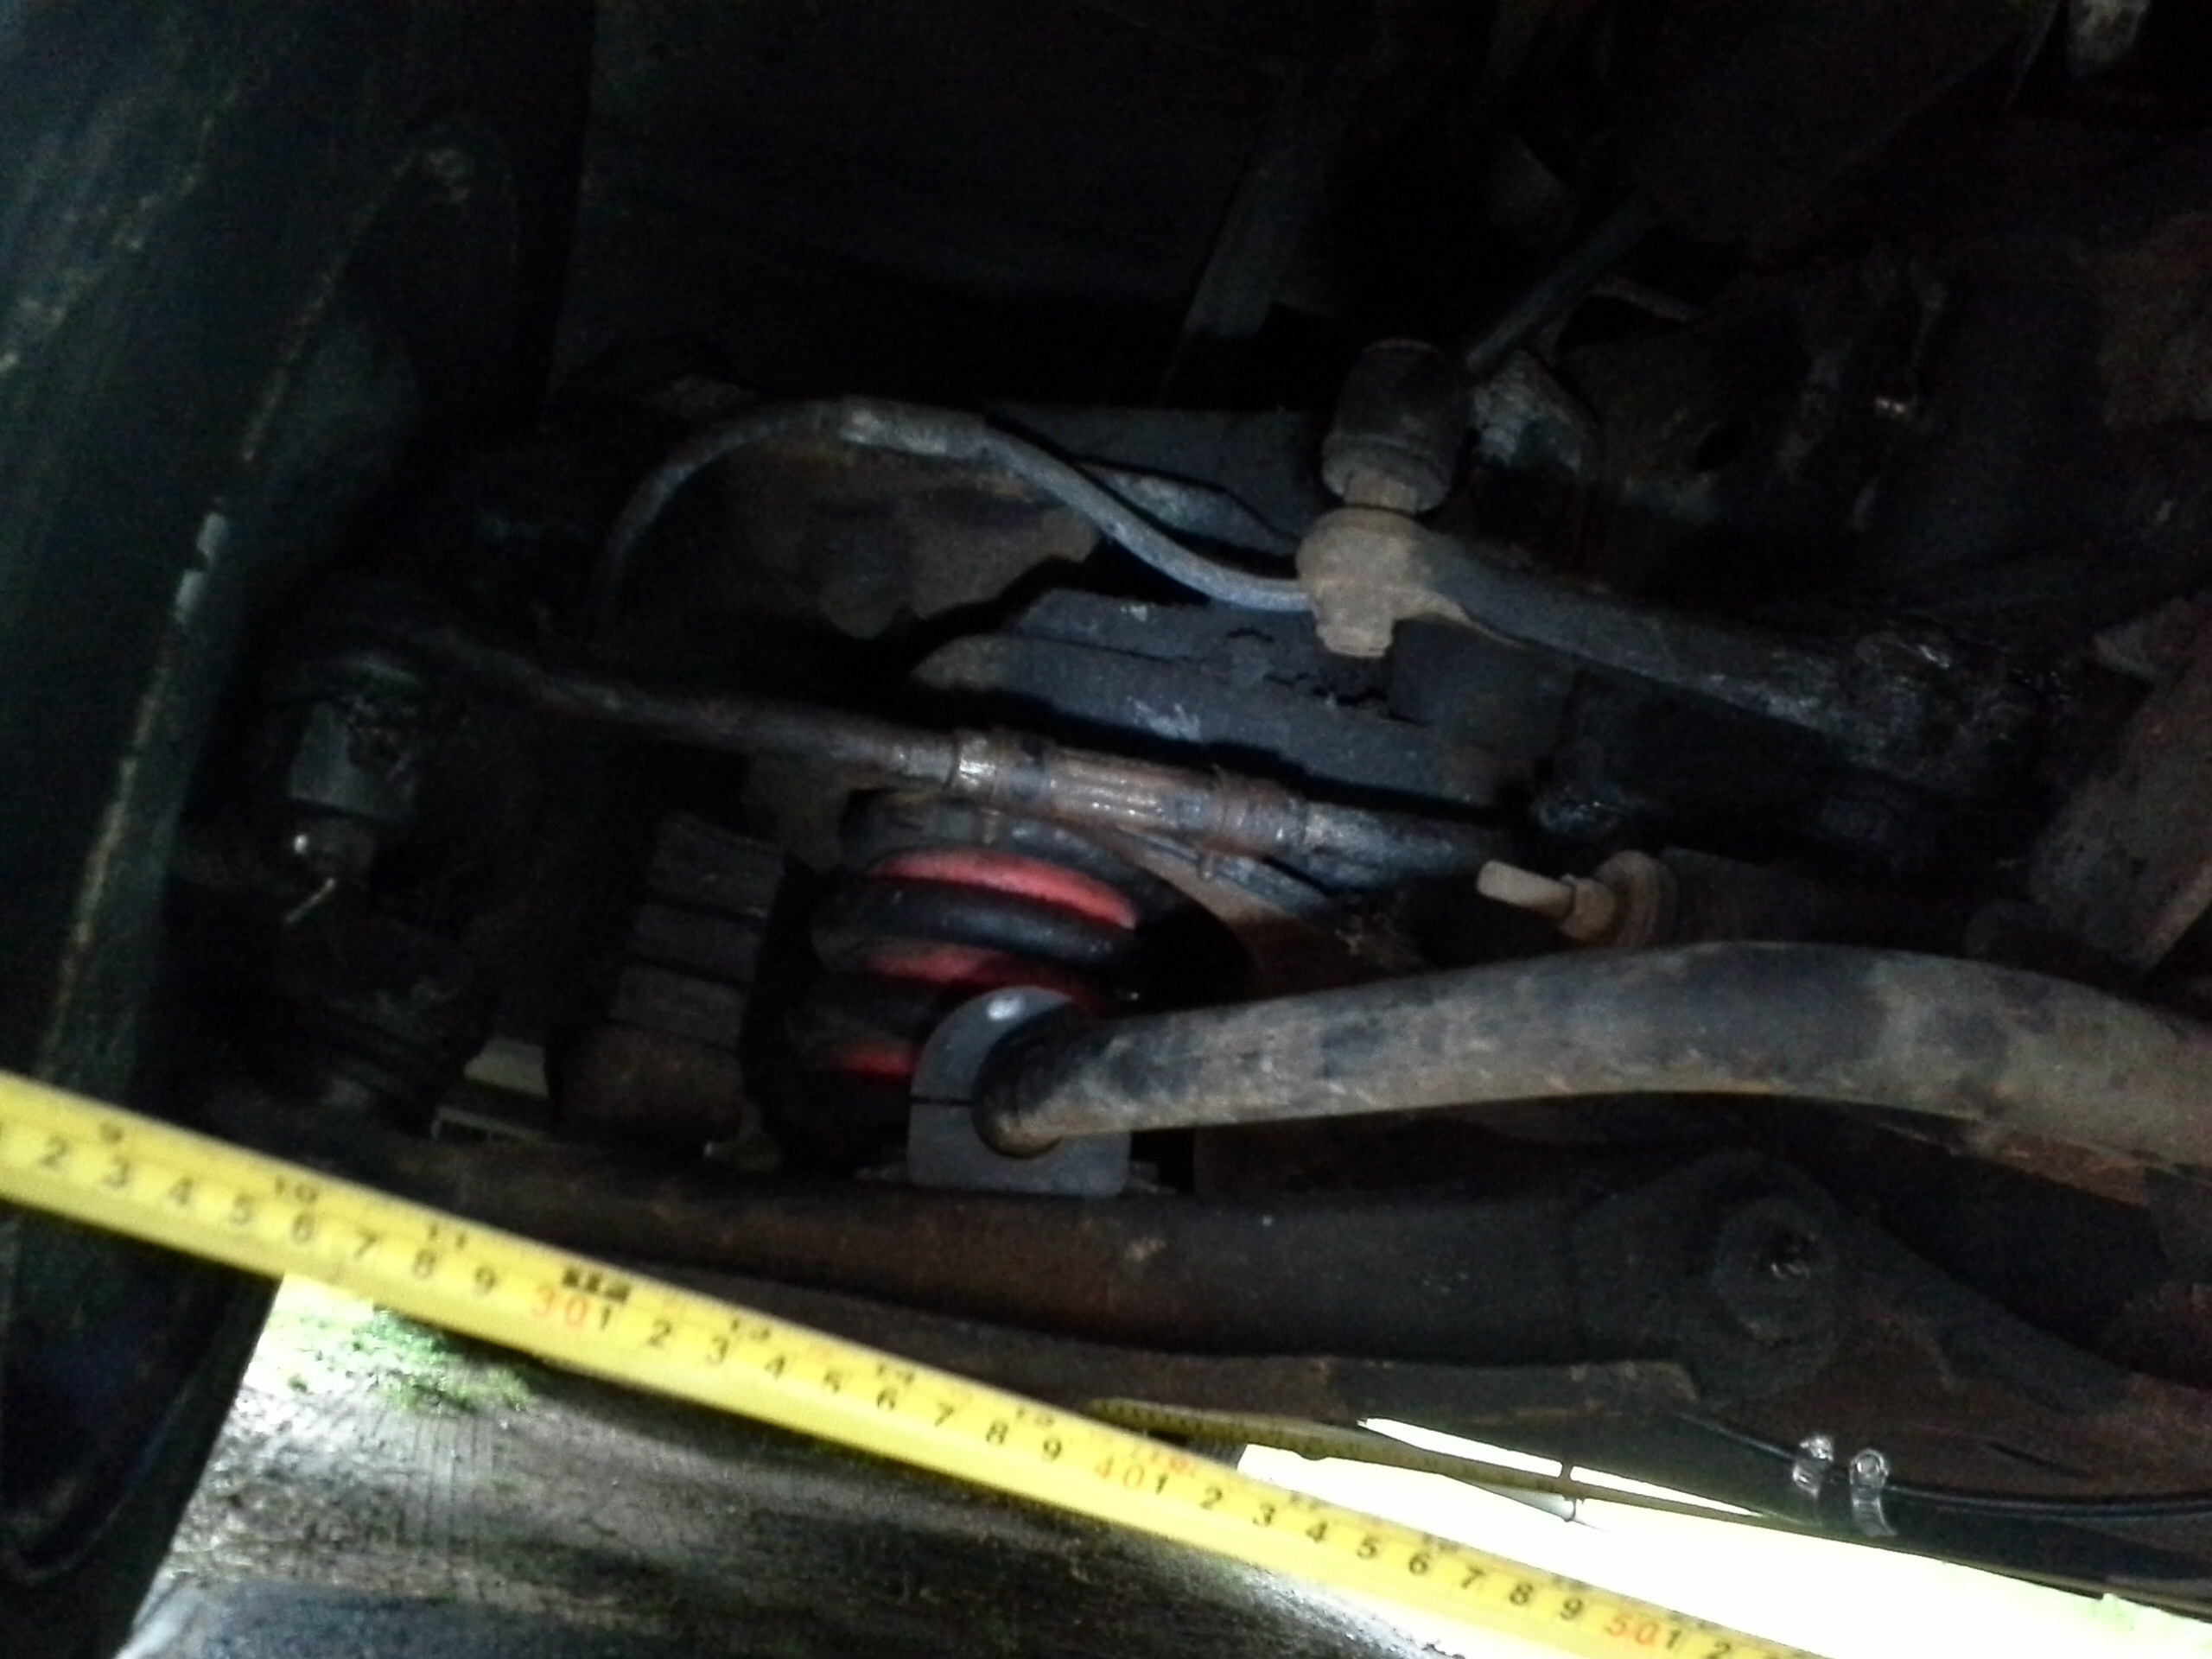
Passenger, right side adjuster, just before the red air bag,
you
can make out the bolts to loosen.
I used a pipe wrench to break
it loose, and Channel Lock pliers to turn it.
The picture on the above shows steering wheel angle and what adjustment to do to
make it straight. If the wheel is
toward the left then reverse the adjustment direction.
The engineers used the same parts for the right, the passengers side,
flipping them over, so the expression is
"righty loosy and lefty tighty" Confusing isn't it. That messed me up a lot too.
I found out that one whole turn of the adjuster equaled about
1/8 of an inch movement of the tire on one side.
Your rig may be different. But don't turn more than 1/8 turn and measure again
to see if the results are what you want.
If it is backwards then go back and reverse the adjustment plus another 1/8th
turn to make the adjustment.
Mind you, the alignment adjusters are horizontal and depending
which way you lie down on,
this may reverse the direction and also mess your thinking up.
I found that it worked best if I watched the wheel being aligned with the
machinist square on the front side of the tire.
If I goofed and started to turn the adjuster the wrong way I would see that
immediately and reverse the direction.
I could then move the alignment in very small amounts when I was getting close.
If you are seeing one turn or more to begin to see
a movement then the steering linkages are loose and you should replace them.
This routine works for each side, doing one side then the
other until the alignment is in specification.
By carefully moving the wheel alignment you won't have to do many
re-adjustments. Be sure to keep checking the toe in so it doesn't drift off.
Once you are done, make sure that you tighten up the bolts to
the adjusters to keep everything safe.
Take the measuring tapes off the tires and drive the RV to see if the alignment
is good (doesn't pull right or left, if it does then the toe in is off) and the steering
wheel is straight. If it is you are done.
You will find that you can align it quite quickly, maybe in a hours time and be back on the road.
The key is to keep the carpenter squares in position at all times and turning
the adjusters in the right direction!
I know I messed up several nearly good alignments because of that.
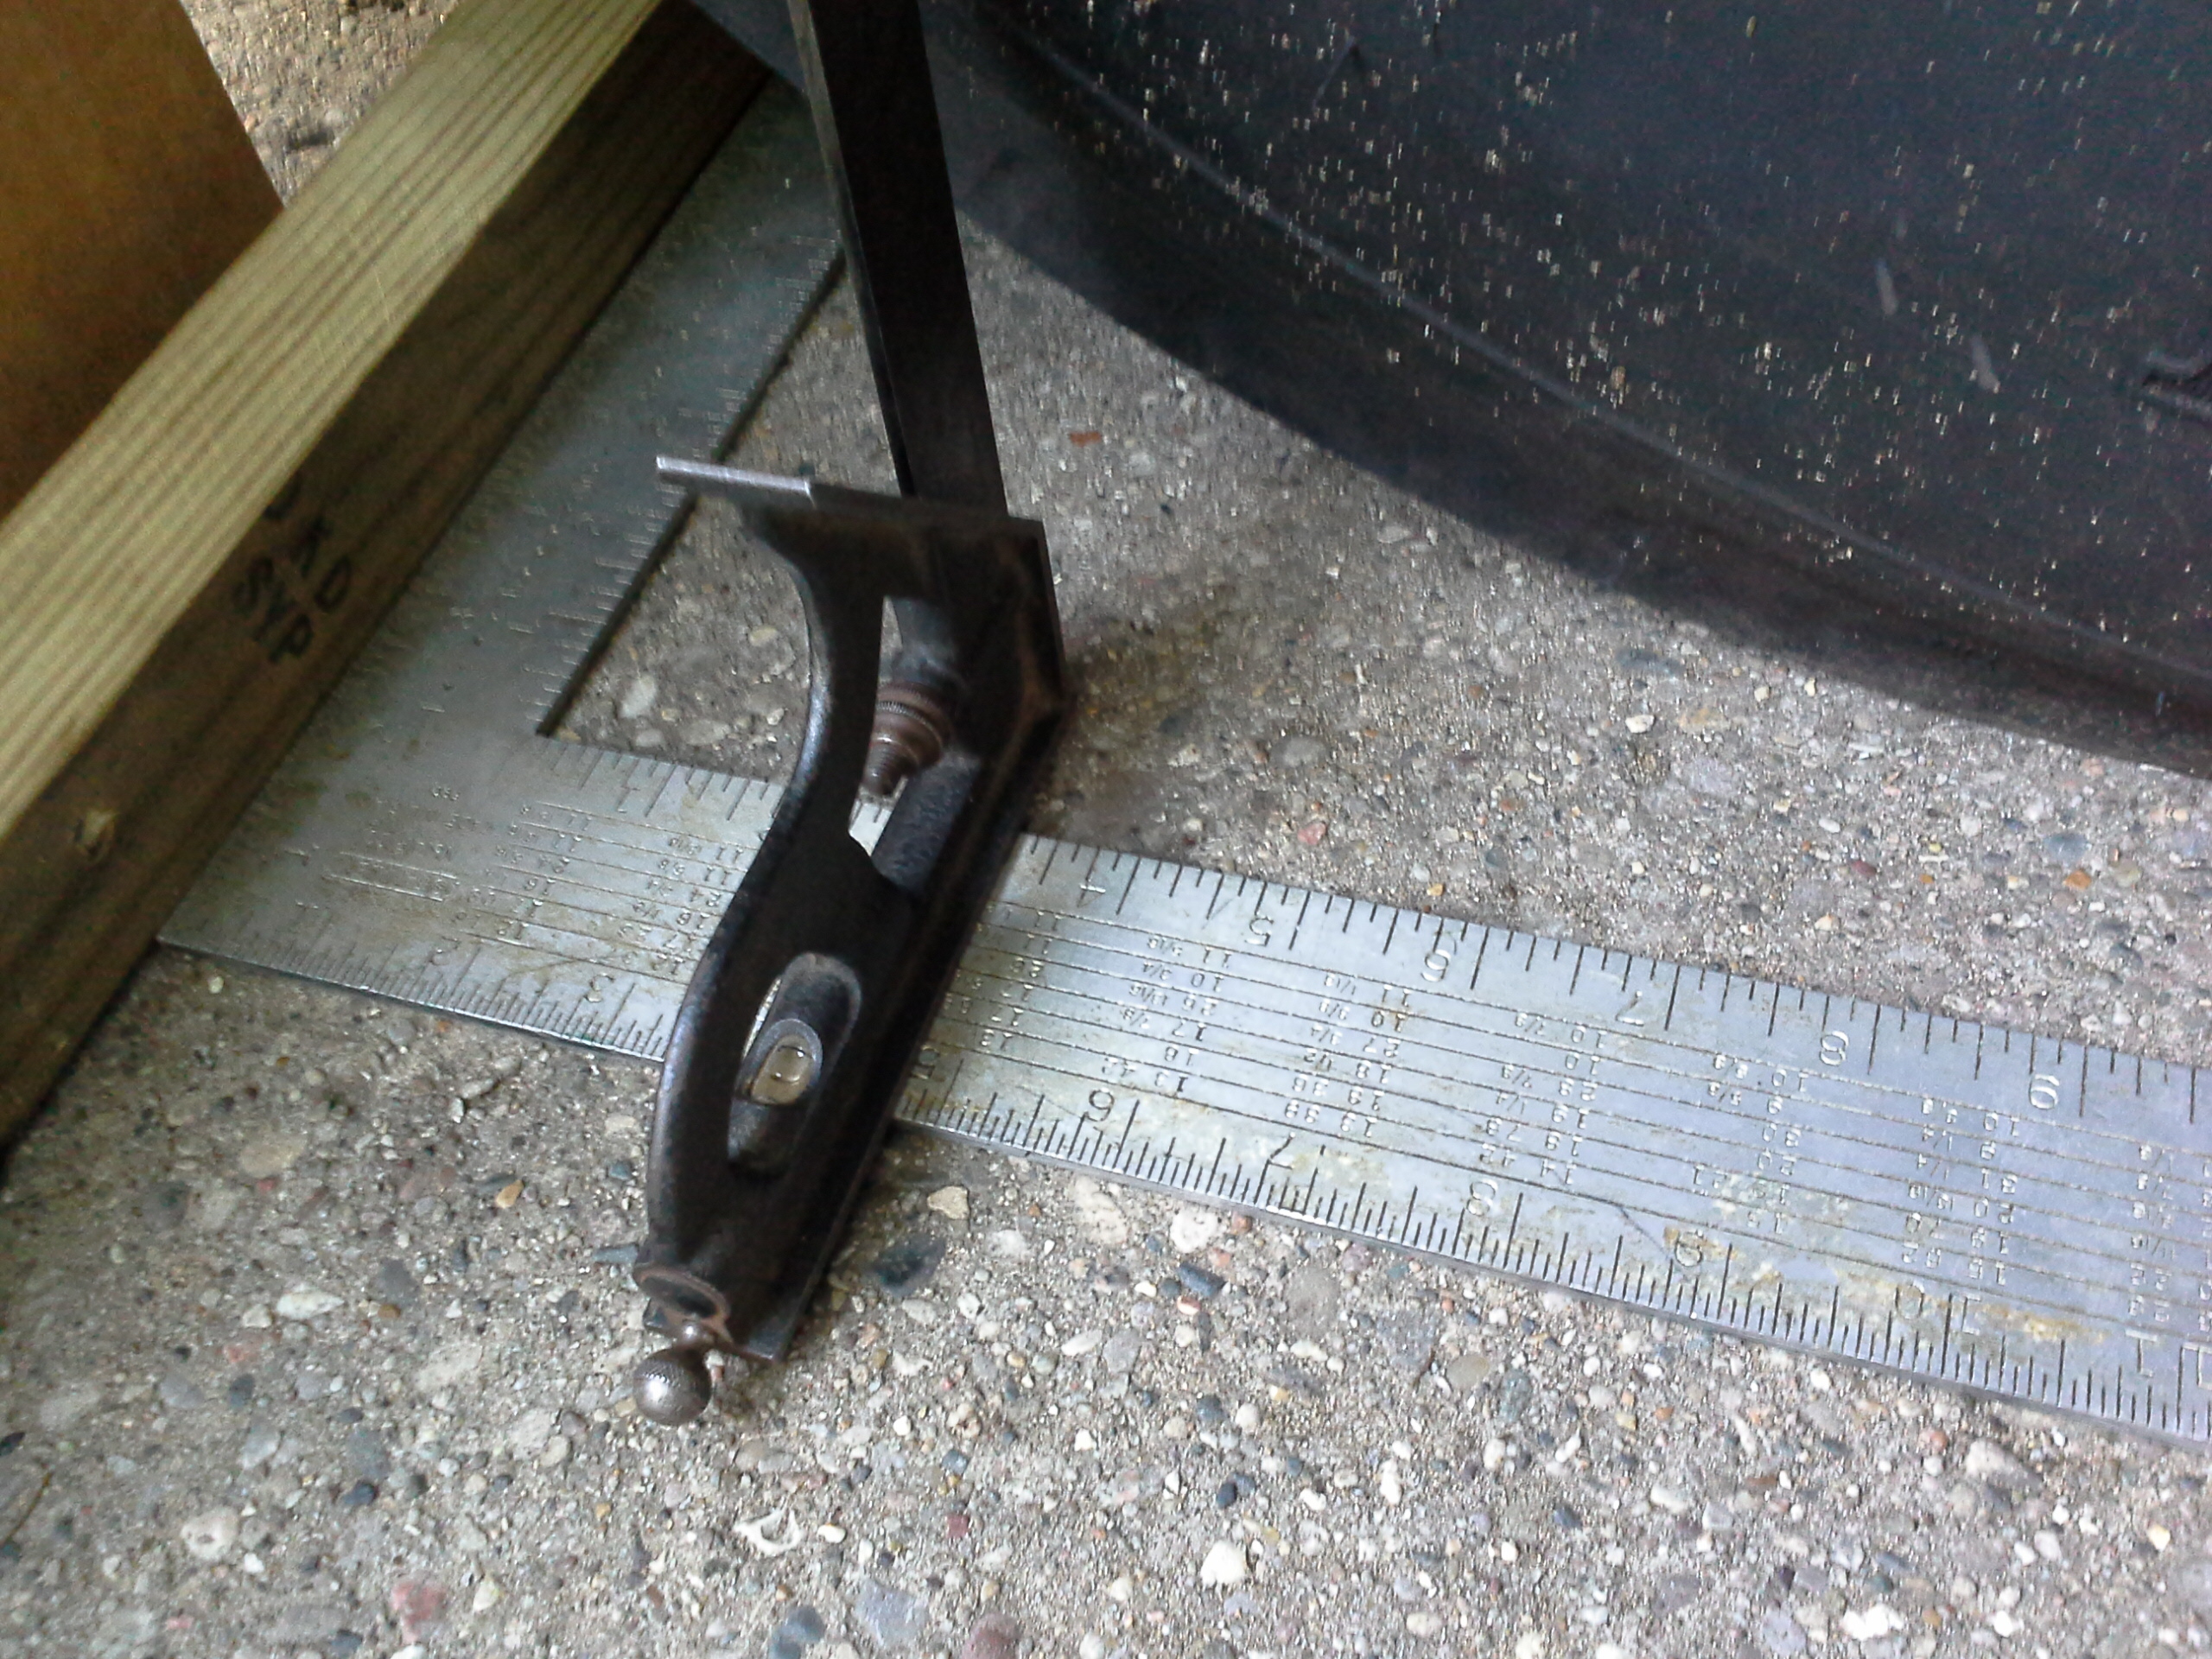
I figured out a way to keep the carpenters squares aligned. I made small clips that I screwed to the board and that kept them from moving around.


This the bottom side of the clip. I used scrap 1/8th" thick aluminum but you could steel plate as well. I bent the edge over to grab the edge of the square.

Looking edgewise at the clip showing the bent aluminum.

I used two tape measures to see if the squares were truly aligned. The
numbers must be the same, they were close, off by 1/4 inch.
On the left side top of the board is a 1/8th" scrap of
aluminum I used as a shim to align the left square. I am going to screw the shim
to the board to keep it i place.
The white pads are scrap floor tiles 2 each, with oil between the faces so the wheels would rotate easily when the wheels were on them.
The new clips kept the squares aligned with the 2X2 board and made it easier to check the alignment.